 Back to list
The following is a tutorial on how to correctly set paper parameters and printing methods through the driver after installing the Gprinter printer driver:
1、print speed and depth settings
2、label size settings
3、label spacing, black mark settings
4、label offset settings
5、label printing area settings
6、graphics effect settings
7、barcode font and command font settings
8、custom command settings
9、print test page
the specific operations are as follows:
1、print speed and depth settings:
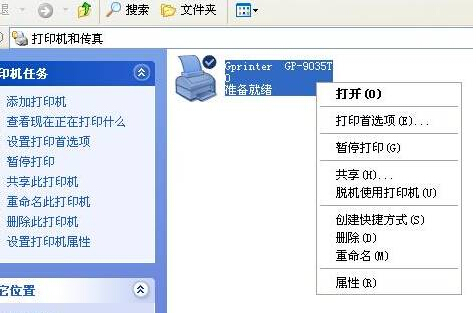
start menu - devices and printers - right-click the printer driver - select the "printing preferences" window, as shown in the figure below.
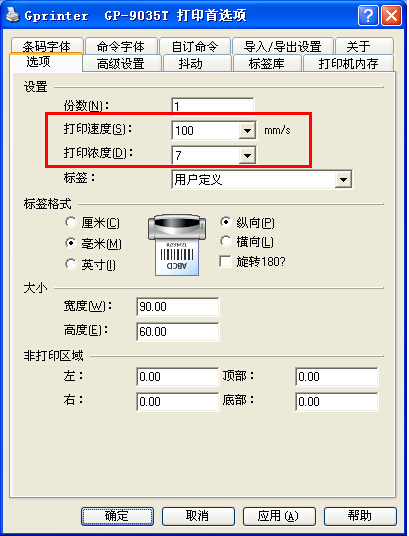
click on the option,“"print speed" and "print density"adjust according to the actual paper and consumables used, especially when using thermal transfer printing, the paired use of speed and density will have an impact on the printing effect, as shown below:
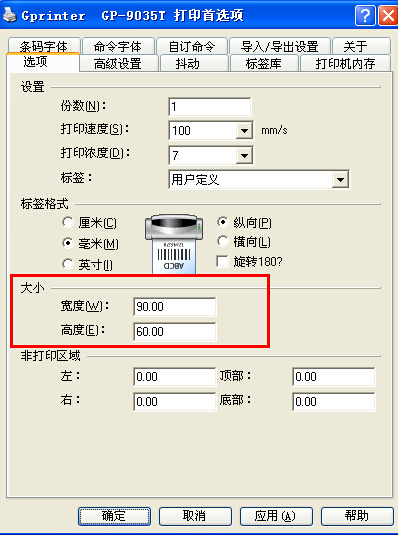
2、label size settings:
exist“size"enter the actual size of the paper or printing range in one column. if it is label paper, it only indicates the size of the printable format and does not include the backing paper, as follows:
3、label spacing and black mark settings:
select according to the actual paper type used. if it is a label paper with spacing, select "spacing". if it is a paper with a black mark on the back, select "spacing".“black label",for continuous paper, select "continuous".
it is best to keep the default settings in the media settings column, because the printer will automatically detect which media is used after it is turned on, and subsequent printing will continue based on the current media. you can specify a method manually if needed.
in the option column, specify the setting of the paper retention position after the task is completed. "none" means that the paper will stop after the printing is completed without any operation. "peel off paper" will turn on the front-end paper presence sensor, and it will stop after each printout until the user intervenes to remove the printed label before printing the next one. this setting is suitable for printers with peeling devices, such as GP-3150TN。 cut, batch and partial cut functions GP the printer is not supported yet.
click "other"
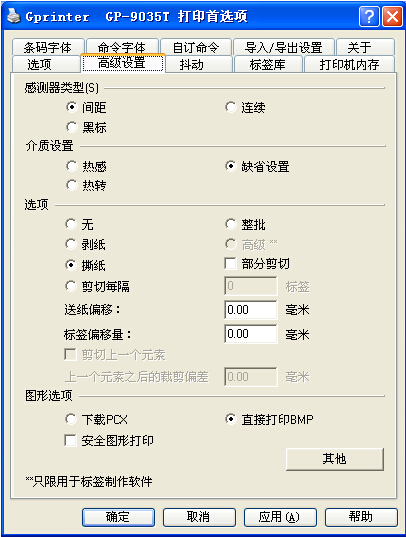
“spacing /black mark"adjust the "length" parameter in one column and adjust this parameter according to the height of the gap between the label and the label on the label paper used by the user.
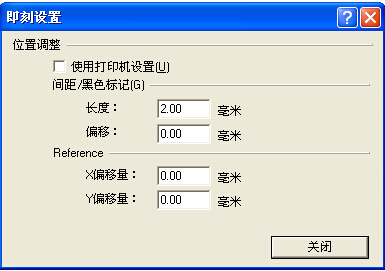
after completing the above settings, click ok to leave the preference settings. in the "general" tab of the driver properties, click print test page to observe the print quality after the above settings and determine whether it meets the paper material and size.
4、label content offset adjustment:
after setting the correct parameters above, printing may cause the label content to be offset because the label is too small or the label specifications are inaccurate, and when the user has no room to move in the editing interface, the following parameters can be used to make accurate corrections:
if onlywhen the label is positioned above or below:
select printer "properties" ‐‐‐‐‐‐‐“printing preferences" ‐‐‐‐‐‐‐‐“"advanced settings", there is a parameter setting for the label offset in the "options" column. this parameter can be filled in with a positive value or a negative value. the paper output direction of the machine is used as a reference, and the positive value is the reverse offset. , a negative value is a positive offset. after adjustment, you can print multiple pages continuously to see if the offset is correct.
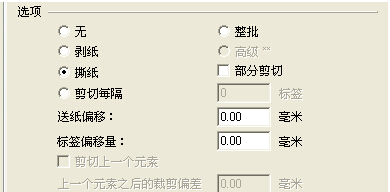
if the label content exists in addition to the upper and lower offsets,offset left and right:
you can select the printer "properties" ‐‐‐‐‐‐‐“printing preferences" ‐‐‐‐‐‐‐‐“advanced settings" ‐‐‐‐‐‐‐‐“"others", set the offset of the coordinate reference point. if only portrait is selected for the label direction, the coordinate origin is at the upper left corner of the paper output direction. if it is rotated 180 degrees vertically, the origin is at the lower right corner of the paper output direction. similarly, if only portrait is selected horizontal, the origin is at the upper right corner of the paper output direction, and horizontal 180 degrees is at the lower left corner of the paper output direction. this parameter only accepts positive values, so please select the direction and offset carefully when adjusting, and try to match the above label offset. use to achieve desired results.
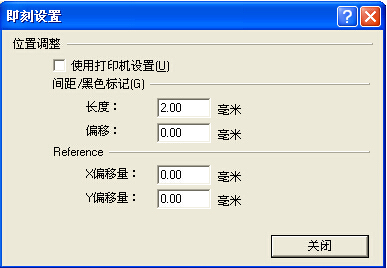
5、label printing area settings:
there are areas on the label that you do not want to print:
when using customized label paper, users may have some areas, usually peripheral areas with printed content or areas where they do not want to print any content. this can be achieved by setting the following parameters: select the printer "properties" ‐‐‐‐‐‐‐“printing preferences" ‐‐‐‐‐‐‐‐“"option", there are non-printing area parameters, please refer to the area size to fill in the corresponding parameters.

6、graphics effect adjustment settings
adjustment of graphics effects: select printer "properties" ‐‐‐‐‐‐‐“printing preferences" ‐‐‐‐‐‐‐‐“"jitter" when different types are selected, the printed graphics will have different print quality. you can adjust it according to the actual effect.
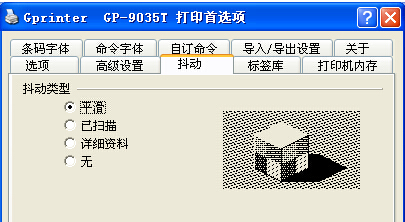
7、barcode font and command font settings:
barcode font and command font settings:
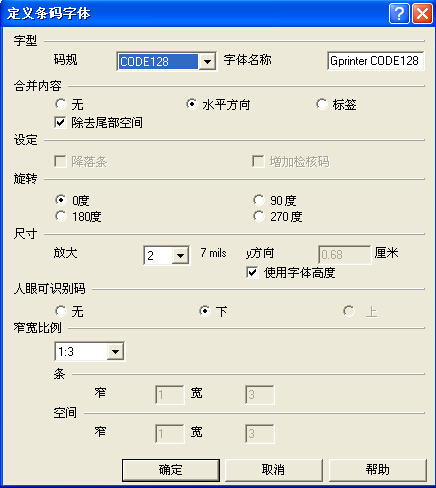
this setting is mainly used to convert the corresponding font into a barcode or direct command in the printer when the corresponding font is specified in the application. select printer "properties" ‐‐‐‐‐‐‐“printing preferences" ‐‐‐‐‐‐‐‐“barcode font"
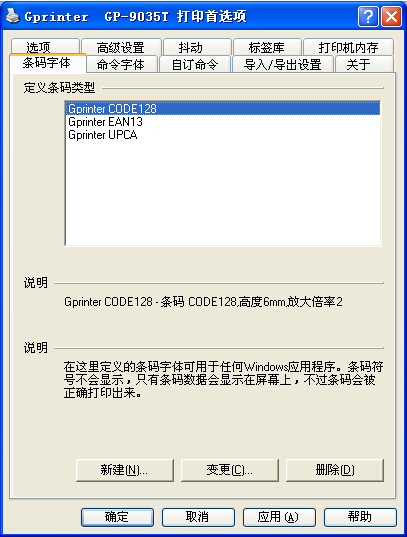
you can create, change or delete defined barcode fonts. parameters include barcode type, direction, size, identification code, width-to-narrow ratio, etc. the command font has been similarly adjusted. as shown below:
8、custom command settings:
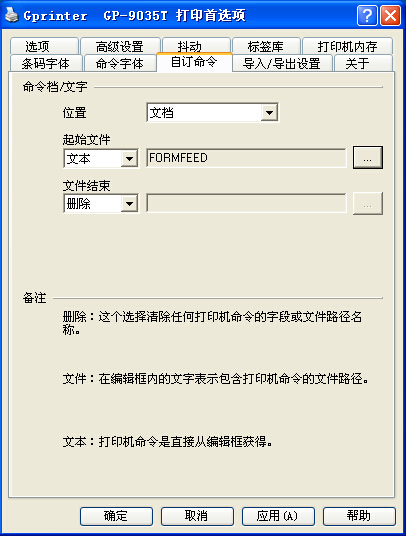
custom command settings: select printer "properties" ‐‐‐‐‐‐‐“printing preferences" ‐‐‐‐‐‐‐‐“custom command" this setting page is used to insert customized instructions or instruction files at different locations in the driver print task. you can add the required instructions before and after the document or page according to your own needs. you can obtain instructions from the file or directly enter them. enter the command into the box as shown below.
9、print a test page:
right-click the driver - printer properties - general - print a test page, as follows:

if you cannot solve it yourself, please consult online technical customer service. for driver software, please go to shanghai dengyuan official website. www.barcodesh.com“ download "download center"
service hotline: 021-67676808
Installation video tutorial
Frequently asked questions